


A Radio Button Shopping Cart Trick
Here's an approach for animating products added to a shopping cart that handles an infinite number of items using a variation of the ol' Checkbox Hack. A Radio Button Shopping Cart Trick originally published on CSS-Tricks, which is part of the DigitalOcean family. You should get the newsletter.

Editor’s note: This is a really clever idea that Preethi shared, but you will also see that it comes with accessibility drawbacks because it uses duplicated interactive elements. There are other ways to approach this sort of thing, as Preethi mentions, and we’ll look at one of them in a future article.

Two large pizzas for yourself, or twelve small ones for the kids party — everyone’s gone through the process of adding items to an online cart. Groceries. Clothing. Deli orders. It’s great when that process is simple, efficient, and maybe even a little quirky.
This post covers a design referred as infinite selection. Metaphorically infinite.
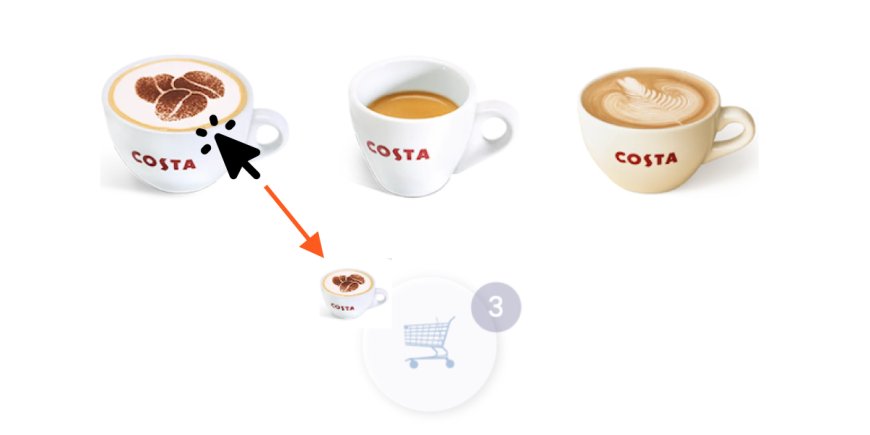
Here’s how it works:
That’s right, you click an item and it jumps right into the shopping cart, complete with a smooth transition that shows it happening. You can add as many items as you want!
And guess what: all of it is done in CSS — well, except the part that keeps count of selected items — and all it took is a combination of radio form inputs in the markup.
I’m going to walk you through the code, starting with the layout, but before that, I want to say up-front that this is just one approach. There are for sure other ways to go about this, and this specific way comes with its own considerations and limitations that we’ll get into.
The Layout
Each item (or product, whatever you want to call it) is a wrapper that contains two radio form inputs sharing the same name value — a radio group.
When you check one in a duo, the other gets unchecked automatically, leading to a see-saw of check and uncheck between the two, no matter which one is clicked.
Each item (or radio group) is absolutely positioned, as are the two inputs it contains:
.items {
  position: absolute;

  input {
    position: absolute;
    inset: 0;
  }
}
The inset property is stretching the inputs to cover the entire space, making sure they are clickable without leaving any dead area around them.
Now we arrange everything in a layout. We’ll use translate to move the items from a single point (where the centered cart is) to another point that is a litte higher and spread out. You can code this layout anyway you like, as long as the radio buttons inside can make their way to the cart when they are selected.
.items {
  --y: 100px; /* Vertical distance from the cart */

  &:not(.cart) {
    transform: translate(var(--x), calc(-1 * var(--y)));
  }
  &.espresso {
    --x: 0px;  /* Horizontal dist. from the cart */
  }
  &.cappuccino {
    --x: -100%;
  }
  &.flat-white {
    --x: 100%;
  }
}
So, yeah, a little bit of configuration to get things just right for your specific use case. It’s a little bit of magic numbering that perhaps another approach could abstract away.
Selecting Items
When an item () is selected (:checked), it shrinks and moves (translate) to where the cart is:
input:checked {
  transform: translate(calc(-1 * var(--x)), var(--y)) scale(0);
}
What happens under the hood is that the second radio input in the group is checked, which immediately unchecks the first input in the group, thanks to the fact that they share the same name attribute in the HTML. This gives us a bit of boolean logic a là the Checkbox Hack that we can use to trigger the transition.
So, if that last bit of CSS moves the selected item to the shopping cart, then we need a transition to animate it. Otherwise, the item sorta zaps itself over, Star Trek style, without you telling.
input:checked{
  transform: translate(calc(-1 * var(--x)), var(--y)) scale(0);
  transition: transform .6s linear;
}
Keeping Count
The whole point of this post is getting a selected item to the cart. There’s no “Cart” page to speak of, at least for the purposes of this demo. So, I thought it would be a good idea to show how many items have been added to the cart. A little label with the count should do the trick.
let n = 0;
const CART_CNT = document.querySelector("output");
document.querySelectorAll("[type='radio']").forEach(radio => {
  radio.onclick = () => {
    CART_CNT.innerText = ++n;
    CART_CNT.setAttribute("arial-label", `${n}`)
  }
});
Basically, we’re selecting the cart object (the element) and, for each click on a radio input, we increase an integer that represents the count, which is slapped onto the shopping card icon as a label. Sorry, no removing items from the cart for this example… you’re completely locked in.
Apa Reaksimu?